Contents
1.1.1 Recommended Shortcuts for Desktop.
1.1.2 How to get rid of the arrow on a shortcut's
icon.
1.1.3 How to get rid of unwanted icons (Tweak UI).
1.1.4 How to refresh the Desktop without restarting.
1.1.5 Shortcut to Control Panel's Display Settings.
1.2.1 Cycling through applications.
1.2.1.1 Alt+Tab
1.2.1.2 Alt+Shift+Tab
1.2.1.3 Alt+Esc
1.2.2 Opening the Start Menu (Ctrl+Esc)
1.2.2.1 Switching applications through Taskbar
1.2.2.1.1 Ctrl+Esc, Tab
1.2.2.1.2 Ctrl+Esc, Tab, R/L Arrows (Alternate
build)
1.2.3 Undo, Cut, Copy, Paste
1.2.3.1 Undo (Ctrl+Z) (Alt+Backspace)
1.2.3.2 Cut (Ctrl+X) (Shift+Del)
1.2.3.3 Copy (Ctrl+C) (Ctrl+Insert)
1.2.3.4 Paste (Ctrl+V) (Shift+Insert)
1.2.4 New, Open, Save, Print
1.2.4.1 New (Ctrl+N)
1.2.4.2 Open (Ctrl+O)
1.2.4.3 Save (Ctrl+S)
1.2.4.4 Print (Ctrl+P)
1.2.5 Closing Windows with Keyboard Shortcuts (Alt+F4)
1.3.1 How to not open a new window when opening a new folder.
1.3.2 Right click
1.3.2.1 "New" Menu on right click.
1.3.2.2 Send To Menu on right click.
1.3.2.3 Move, Copy, Shortcut
1.3.2.4 Open With...
1.3.3 How to show a bitmap image as it's own icon.
1.3.4 File associations.
1.3.5 Setting default path for Explorer.
1.3.6 File Manager (Winfile.exe)
1.4.1 How to delete files instead of sending them to
the Recycle Bin.
1.4.2 How to rename the Recycle Bin.
1.4.3 How to get rid of the Recycle Bin.
1.5.1 Moving the Start Button
1.5.2 Closing the Start Button
1.5.2.1 Re-Opening the Start Button
1.5.3 Documents in Start Menu
1.5.4 Control Panel Shortcuts in Start Menu
1.5.5 Clearing Run History
1.6.1 Selecting Taskbar without searching the Start
Menu.
1.6.2 Tricks to hide the Taskbar (Auto-hide, Sizing, Location,
Color).
Having spent the last several months trying to push my way through all the babble and B.S. surrounding Windows 95 in order to understand how to truly use it, I have found the need for a straightforward and (mostly) complete information source such as this one. These are techniques on how to "tweak" windows 95 in order to make it easier to use, change it's appearance, or just get back at it for the countless hours of frustration it's put you through. Use it in good health.
Before you go any further, you may want to lay your hands on a couple of programs, namely "Tweak UI" (A Microsoft product) and "Winhacker 95" (AKA Winhack). Both programs are available on the internet (and since you found this program, I expect that you already have access to that). Try searching CNET's Download.Com for them. If you can't find them there, try any of the major web search engines (Yahoo!, Altavista, etc.). If you can't find "Tweak UI" on it's own, it comes with the "PowerToys" Package.
Other programs that may be of use are Paint Shop Pro (A graphic editor), MicroAngelo (An icon editor), and HEdit (A hex editor). These programs are also available through the internet in shareware or evaluation form.
Desktop Shortcuts, when properly used, can make things go a lot faster for you. The folks at Microsoft couldn't just start us off with a convenient system, that would make sense. So here's some Shortcuts that should have been in the original configuration, but weren't.
There is only so much I can tell you about which Shortcuts to have on your system, not actually seeing it, and knowing what you use. But, once you get the idea here, you'll be able to customize to your heart's content, or to Win 95's limits anyway.
C:\
How many times a day does the average person go through their file structure? I don't know about you, but I'm in there a few times every Windows session. But, strolling through the Start Menu or hunting around My Computer is just too much of a pain, when you do this as much as I do. It's pretty damned simple to fix that, though.
1. Double-click My Computer.
2. Drag the drive's icon onto the Desktop (I recommend you do this for
all of your drives).
3. When it prompts you to create a Shortcut, tell it yes.
Now, if you're like me, those default icons will get pretty sickening after a while. This is also pretty easy to fix. Got a .bmp or a .ico handy?
1. Right click the Shortcut's icon.
2. Select Properties.
3. Select the "Shortcut" tab.
4. Select "Change Icon".
5. Click on "Browse...".
6. Select the graphic you want to use.
There you go!
1.1.2 Getting Rid of the Arrow on a Shortcut's Icon.
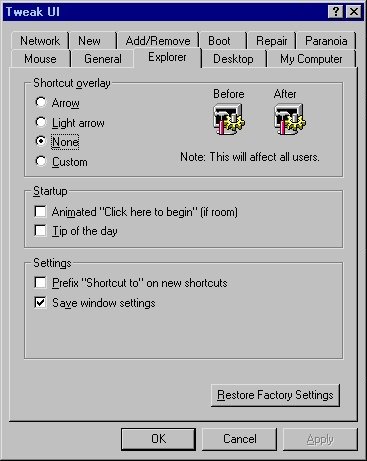
This is real easy with a program like "Tweak UI" which is easily available on the internet and which is also put out by some of the folks from MS (If you don't find it on it's own, it comes in the "PowerToys" package).
If you have Tweak UI (And if you don't, then go get it) then just select the Explorer tab and you'll find it in the top frame. If you don't, then there's still a way to do it, but it gets more technical.
Warning: Before you edit the Registry, read the comments in Section 3.0 of this text.
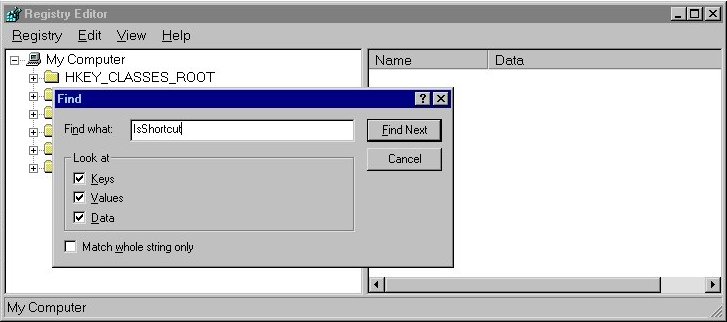
1. Run the Registry Editor (Regedit.exe).
2. Select "Find..." from the "Edit" menu.
3. Search for the text "IsShortcut" and delete all references
to it.
4. Refresh the Desktop to see the changes (See Section
1.1.4).
This method has not been tested by the author, who used the Tweak UI method. The author is merely reporting a method he discovered elsewhere on the 'net.
Note: Tweak UI also has the option to remove the "Shortcut to" comment automatically. Microsoft has claimed that after deleting this text 8 times Windows 95 will learn to do it for you, however this does not always work.
1.1.3 Getting Rid of Unwanted Icons on the Desktop.
Do you actually use the Network Neighborhood, My Briefcase, or many of the other Shortcuts that come installed on the Desktop? If not, you may have already tried to rid yourself of them and found it impossible. But, don't give up hope yet! There's still a couple of ways to do it... The easiest comes in the form of Microsoft's Tweak UI, but there are ways to do it using the Registry and Policy Editors...
Tweak UI:
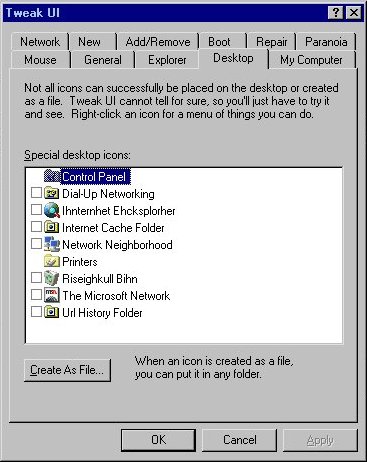
1. Select the "Desktop" tab.
2. Uncheck the program you don't want to show on your Desktop.
Regedit/Poledit:
Warning: Before you edit the Registry, read the comments in Section 3.0 of this text.
For those of you who don't have pre-packaged software, you may be able to use this method.
I have not tested this method myself (nor can I, as I have pre-packaged software which will not allow the use of Poledit), I am merely reporting a method I discovered elsewhere on the 'net.
1. Run the System Policy Editor (Poledit.exe) from the "Admin\Apptools\Poledit" folder of your Windows 95 CD-ROM (In some beta versions of Win 95 it can be found in "Mig_kit\Admin95\Apptools\Poledit").
Note: If you are asked to "Open a Template File", choose admin.adm in the same folder.
2. Select Open Registry from the File menu.
3. Double-click on the Local User icon.
4. Open Local_User\ Shell\ Restrictions.
5. Check Hide Network Neighborhood.
6. Click OK, and select Save from the File menu.
7. Restart Windows to see the changes (See Section 2.4).
1.1.4 How to Refresh the Desktop Without Restarting Windows.
There are times when you'll need to refresh the Desktop to see changes that you have made. This can be accomplished in a couple of ways.
First, simply click on an open area of the Desktop and hit F5.
If this doesn't work, then:
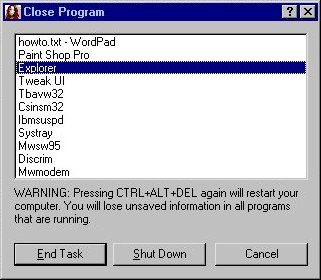
1. Press Ctrl+Alt+Delete and release.
2. Select "Explorer" and click "End Task".
3. When you are prompted with the Windows 95 Shut Down Menu (As you would
if you
selected "Shut Down" from the Start Menu),
choose "No".
4. After a moment, you will be prompted to either End Task on Explorer
or to cancel and
return to Windows. Select End Task.
1.1.5 Shortcut to Control Panel's Display Settings.
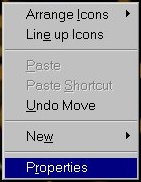
Rather than hunting through menus till you find Display in the Control Panel, you can also access this function by right clicking an open area of the Desktop and selecting "Properties".
Sometimes, it's just easier to do things without using the mouse. You can bypass hunting through menus, or just keep that mouse hand free for other things (Like pouring coffee, Jolt, Mountain Dew or any other high-caffeine beverage down your throat). Here are some helpful keyboard shortcuts.
1.2.1 Cycling Through Applications
So you've got a couple applications (apps) open, and you want to switch from the active app to one of the ones running in the background... Do you click on it in the Taskbar? Maybe you're hand is busy holding a Jolt or a cup of coffee (The official beverages of hacking), maybe you've got mouser's finger and you just can't stand one more click, maybe you're busy dialing phone sex numbers on speaker-phone, who know why, the point is that you don't want to use the mouse, but you've got to get that app up right now... Here's how it's done.
The traditional method of cycling through apps, from way back in the days of Windows 3.1. Just hold down the Alt key while you tap Tab to cycle through the open applications. This will bring up a box showing the program's icon and below it the app's name will be displayed. When you have the program you want highlighted, just let go of Alt, and it'll pop up as the active window.
If you only have one app opened, but it's minimized, Alt+Tab should pop it right open for you.
OK, so you've got Alt+Tab going and you're feeling pretty hot, right? After all, real techies don't use Taskbar, do they? But, now you're showing off just how hot you are, you've got your program highlighted, but you bump tab one too many times... Do you cycle all the way through again? Is that what the super-techie does? Nope. Well, OK, some of us do, but here's another way.
Swing another finger around so you can hold down Alt+Shift, then click Tab one more time... there you go, you have learned how to tab backwards through the list of open apps. Now all you need is your Jolt and your Hex Editor and you're set... ;o)
So, what if you only have two programs open? Do you really need to go and cycle through the program list just for that? Nope. Hold Alt and hit Escape. This will select the next open application, equivalent to hitting Alt+Tab once. However, if the program you cycle to has been minimized, it will not restore that program window, it will merely select the program. You will need to hit enter to restore it.
1.2.2 Opening the Start Menu (Ctrl+Esc)
OK, So you've discovered the wonders of the keyboard shortcut by playing with Alt+Tab. And you're raring to just yank that mouse out and do it all with Alt keys... Well, there's more you'll need to learn first. After all, how are you going to open up the Start Menu to get at those programs in the first place? Don't lose heart yet! Just hit Ctrl+Escape. To close the Start Menu, hit Esc again.
1.2.2.1 Switching applications through Taskbar
So now that you've got the Start Menu open, lets try a different way to cycle through those applications...
All right, close the Start Menu using Esc. You'll notice that the Start Button is highlighted with a dashed rectangle. Now hit Tab. Depending on the build of Windows 95 that you are using, this may depress the application's button in the Taskbar as if it were open (Otherwise, see the next Section). Just hit Enter when you have the one you want selected. As with Alt+Tab, you can add Shift in order to Tab backwards through the open applications.
1.2.2.1.2 Ctrl+Esc, Tab, R/L Arrows (Alternate build)
However, if you're like me the Ctrl+Esc, Tab method may not do it for you. But it can still be done. Just go through the same process, open the Start Menu, close it, hit Tab once. Now you should be able to switch between the open applications using the right and left arrow keys and when you have the one you want selected, hit Enter.
When you're using a word processor, or just about any program, you'll sometimes need to cut and paste, or to undo changes you've made accidentally, these common activities have keyboard shortcuts too.
1.2.3.1 Undo (Ctrl+Z) (Alt+Backspace)
So, you had your whole text highlighted, getting ready to cut and paste it somewhere else, but you accidentally slap the spacebar and the whole thing disappears... No problem! Just use the Undo command. You could go to the Edit Menu in most applications, or you can try the keyboard shortcut, Ctrl+Z. Depending on the way you use the Ctrl keys, this may be pretty inconvenient though. I generally use the palm of my hand to depress Control, so Z is too close for comfort, but if you can use this command, more power to you...!
Note: For some applications, the command Alt+Backspace works instead of or in addition to Ctrl+Z.
1.2.3.2 Cut (Ctrl+X) (Shift+Del)
As with Ctrl+Z, this keyboard shortcut is a substitute for the Edit Menu command Cut. This will remove the highlighted text, while copying it to the clipboard for later pasting.
Note: For some applications, the command Shift+Del works instead of or in addition to Ctrl+X.
1.2.3.3 Copy (Ctrl+C) (Ctrl+Insert)
Once again, this keyboard shortcut is a substitute for clicking on the Edit Menu command Copy. This will leave the highlighted text in place, while copying the text to the clipboard for pasting.
Note: For some applications, the command Ctrl+Insert works instead of or in addition to Ctrl+C.
1.2.3.4 Paste (Ctrl+V) (Shift+Insert)
The last of the Edit Menu keyboard shortcuts, Paste will place text formerly saved in the clipboard at the cursor location.
Note: For some applications, the command Shift+Insert works instead
of or in addition to Ctrl+V.
Other control commands that can be used within programs include those for opening new or old documents, saving current documents, or printing them out.
To create a new document, as an alternative to using the File menu, in many programs Ctrl+N will work as a keyboard shortcut.
As a keyboard shortcut for the open command off the File menu, use Ctrl+O.
Ctrl+S will work as an alternative to the File menu's Save command in many programs.
In most programs, Ctrl+P can be used to print the current document instead of using pull-down menu commands.
1.2.5 Closing Windows with Keyboard Shortcuts
Rather not do all that mouse work when closing a window, or shutting
down the computer? Try Alt+F4. It'll close the active program, just as
though you'd clicked the ![]() from the
title bar. If there are no open programs, the active program is windows,
thus Alt+F4 will close windows as though you had selected Shut Down from
the Start Menu.
from the
title bar. If there are no open programs, the active program is windows,
thus Alt+F4 will close windows as though you had selected Shut Down from
the Start Menu.
To close the active window within a program, try Ctrl+F4.
You may not realize it, but most of the work you do is through the program Explorer.exe. Explorer isn't just that program you use to hunt through your file structure, it also contains the coding for the Start Menu and most of the branches off of the Start Menu, such as the Taskbar options. But since those other aspects of Explorer.exe can be viewed as separate entities, this section shall be dedicated to the Windows Explorer, the file manager for Windows 95.
1.3.1 How to not open a new window when opening a new folder.
When you first use Windows 95, every time you open a new folder in Explorer, you'll get a new window with that folder's contents. This would turn most people off ("If I wanted a Mac, I'd have bought a Mac!"), but there are ways to fix this annoyance, both permanently or temporarily.
Temporary:
When opening a new folder, hold Ctrl while double-clicking (If you have already set Explorer to permanently use the same window, this will cause Explorer to open a new window on double-click).
Permanent:
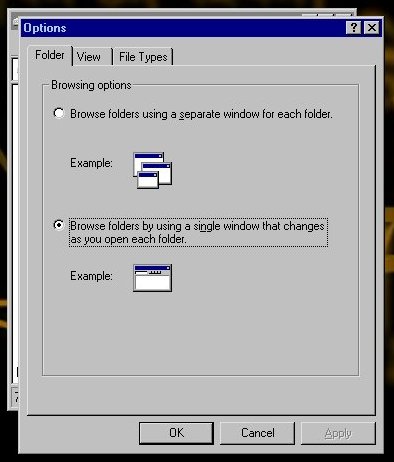
This one is far simpler than you might think. Just go to one of those Desktop Shortcuts to your drives, right click and select "Properties" or open up My Computer. Now go to the View Menu, and choose "Options...". The Folder tab will give you the option to open a new browser window every time, or to re-use the same window.
In Windows 95, it's right click, or die! Well, not quite... But learning how to use a right click will speed things up tremendously. Depending on where you click, you may get options to cut, paste, open, or a number of other things. Here are some tips on how to get the most use out of the right click menus.
1.3.2.1 "New" Menu on right click.
So go to the Desktop and right click on an empty area. You'll see options to Arrange Icons, etc. One of those options is "New", you'll want to get to know this one pretty well, cause it'll save you a lot of time.
New is the equivalent to opening up a specific program, opening the file menu, and selecting "New". It will give you a new document of whatever form you select. But no matter how much those guys at Microsoft may be disappointed by my saying this, I'm just never gonna be creating new bitmaps on the fly, or doing... whatever it is you do with the briefcase, so most of the options you're given off the new menu can just go away and it'll cut down on the clutter a lot. Hell, I don't even have a microphone, why would I be creating new sound files?
The simple way to get rid of these things is to pop open Tweak UI, and select the New tab. Then you can just check and uncheck file types to your heart's content.
But if you don't have Tweak UI to hack the registry for you, I hope you're feeling adventurous (But not too adventurous!) because you're gonna have to do it yourself.
Warning: Before you edit the Registry, read the comments in Section 3.0 of this text.
1. Open the program you want to add to the New Menu.
2. Save a new document into the \Windows\ShellNew\ directory (This directory
may be
set as a hidden directory).
3. Open the Registry Editor (Regedit.exe).
4. In HKEY_CLASSES_ROOT find the extension for the file type you want to
add to the
New Menu.
5. Create a new Key called "ShellNew".
6. In the new Key, create a new string value called "FileName".
Not "FileNew", which is the way I blew it on my first couple of tries.
7. Double click the new string to modify it and add the name of the
document you saved
(If it is in the \Windows\ShellNew\ directory, no path
is needed).
Now go reap the benefits of all your hard work... <yawn>.
1.3.2.2 Send To Menu on right click.
OK, well, I had the feeling that this option should be a great help, but it just hasn't turned out that way. In any case, this is how it works...
The Send To option off right click will send a copy of the selected object to the location you select from the Send To Menu (Unless you send it to the Recycle Bin, in which case it prompts you to delete). But suppose you really couldn't care less about those places; maybe they've been changed (As mine were by MS Office) to something totally useless. Well, there's hope yet.
The Send To options are easily changed, they're just shortcuts in a directory called "\Windows\SendTo\". So, just pop that sucker open, delete what you don't want, and add what you do.
Note: It will not give you the option to change directories if you add the shortcut to a drive, unlike creating a Desktop Shortcut.
Having trouble figuring out just what command will make a file move, what will copy it to a new location, and what just puts a shortcut to it in a new directory? Longing for the days when you could do what you want with one click and a drag? Try this:
Next time you try to move a file's location in Explorer, instead of dragging while holding the left mouse button, right click it. When you drop it in the new location, Explorer will prompt you on if you want to move, copy, or create a shortcut.
Once a file extension has been associated with a program, every time you double-click a file with that extension, that program will be used to open the file. There are times, however, when you will need to open a file using a different program (most likely a text reader, such as Notepad).
I find this trick particularly handy when editing .html or when checking programs for obvious viruses (things like "DEL C:\DOS\*.EXE" are nice to look for before running a potentially hostile program).
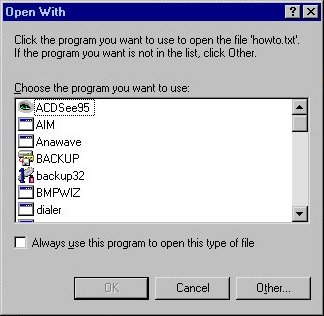
When you do need to use a open a file with a program other than the one associated with it, you simply highlight the file in Explorer, then while holding down Shift, right click on the file. This will bring up the standard right-click menu, with one important change; "Open With...".

Selecting the "Open With..." command will bring up a list of programs to choose from. Just select the program you want to open the file with and there you go.
Note: Pay special attention to the check-box at the bottom of the program list. If it is checked when you open the file, you will change the file association permanently (Or, until you change it again).
1.3.3 How to show a bitmap image as it's own icon.
I don't know about you, but it just seems easier to be able to know what a bitmap (.bmp) image will look like before I open it up. It saves the trouble of hunting through your whole collection, when a simple glance will do the trick.
As with most of the Registry "hacks" that I've shown, there is an easy way and a hard way to do this. Unlike the rest of them, this time the easy way does not involve "Tweak UI". This time, you'll need a program called "Winhacker 95" or "Winhack".
Winhacker 95:
1. From the Shell tab, in the General menu, check the box that says "Show the icon for BMP files as a mini-picture of itself".
Regedit.exe:
Warning: Before you edit the Registry, read the comments in Section 3.0 of this text.
1. Locate HKEY_CLASSES_ROOT\Paint.Picture\DefaultIcon\
2. Set the value data for (Default) to "%1".
If you've tried changing file associations, you'll know that they can be a real pain. The traditional method is to go through My Computer:
1. Select "View"
2. Select "Options"
3. Select the File Types tab.
From there, it gets to be a mess and there's no easy way for me to tell you how to do what you want to do. So, here's how I do it.
1. Highlight a file with the extension you want to change/create.
2. Hold Shift then right click the file.
3. Select "Open With..."
4. Make sure the "Always use this program to open this type of file"
box is checked.
5. Select the program you want associated with this file, and click OK.
Note: See Section 1.3.2.4 for other uses of the "Open With..." command.
1.3.5 Setting default path for Explorer.
Suppose that whenever you hunt through Explorer, you almost always end up going to the same directory (e.g. C:\AOL30\DOWNLOAD\ which is the default download directory for America Online v3.0). After a while, you'll tend to get sick of having to always click through the same directories, and you'll wish there was a way you could just go there to start. You can.
If you look at the Shortcut to Explorer, you'll see that it's target file is something like this:
C:\WINDOWS\EXPLORER.EXE /n,/e,C:\
Now, C:\WINDOWS\ is the directory containing Explorer. EXPLORER.EXE is the program itself. The rest of it (/n,/e,C:\) are command line parameters telling Explorer what to do when it loads (Don't ask me what /n or /e do, I don't know). The one at issue is the last parameter "C:\". This is the parameter telling Explorer what directory it should explore when it loads. So, if you want Explorer to open to the AOL download directory, we change the command line in the Shortcut to the following:
C:\WINDOWS\EXPLORER.EXE /n,/e,C:\AOL30\DOWNLOAD\
1.3.6 File Manager (Winfile.exe)
For those of you who have just switched over from Windows 3.1 and are
missing File Manager, despair no longer. It has been included into Windows
95, though it's presence wasn't really advertised since most people will
eventually come to prefer Explorer's features (I did, anyway). In any case,
you can find File Manager in the C:\WINDOWS\ directory. The program name
is Winfile.exe.
When it comes to annoyances the Recycle Bin is right up there. Constantly sucking up hard drive space and never really deleting anything when you try to delete it, the Recycle Bin was one of the first things to go on my system.
1.4.1 How to delete files instead of sending them to the Recycle Bin.
If you're like me, when you delete something, you want it to go away. That's kinda the point of deleting it, isn't it? Well, the Recycle Bin is there to keep us from accidentally deleting something we really want to keep, but for me that's more annoyance than anything else. I don't need a computer questioning my judgement, and I don't need to do everything twice. So here's how you stop files from going to the Recycle Bin, and make them actually delete when you delete them.
1. Open Explorer to C:\
2. Right click on Recycled, and select "Properties"
3. Click on the tab for your Hard Drive (If you have multiple partitions,
select "Global")
4. Check the box for "Do not move files to the Recycle Bin. Remove
files immediately on delete"
Note: This is also where you can remove the delete confirmation dialogue.
1.4.2 How to rename the Recycle Bin.
For those of you who want to keep the Recycle Bin around on your Desktop, you might get a bit tired of the name. Fear not, you can change it. It does take a bit of a tweak, however. The easiest method is to use Winhacker 95. The Shell tab has a form containing the current name of the Recycle Bin, which you can easily change.
The less easy method requires you to find and download a patch from the internet (I found it under the name rb_ren.zip). You can find it by doing a search for "Rename Recycle Bin Registry Patch" on Altavista, or whatever method you prefer. I have not used this registry patch, so you will need to rely on the documentation that comes with it. The reason I haven't downloaded it, is that I know Winhacker to be a good, relatively safe program, while I know nothing about this registry patch, and I'm not about to let any strange programs go waltzing through my registry.
1.4.3 How to get rid of the Recycle Bin.
Removing the Recycle Bin is actually a combination of two things I've
already discussed. First, you need to make the necessary changes so that
files will be automatically deleted, rather than being sent to the Recycle
Bin (See Section 1.4.1). Second, you will need to
remove the Recycle Bin's icon from the Desktop, which was discussed in
Section 1.1.3.
OK, so now that you know all there is to know about Explorer.exe (That's an idea that'll set your average Techie to spinning in his swivel chair, by the way. You'll never know it all.), there's something we've been missing. Something small. Your Start Menu.
For those of you that don't know, that's that little button thing that probably says Start and is located in the lower left corner of your screen. Yes, I have come across people who didn't know that. But before you start handing out the dunce caps, consider this. There are some people out there who spend more time off their computer than on it (Unlike some people I know). And if that doesn't convince you that the technologically illiterate may still have some intelligence to them, remember this. They didn't write a program that you have to click the button labeled "Start" if you want to shut it off. The left that for us techno-weenies to do.
In their wanderings through Windows 95, most people probably wonder, at some point or other, if there were a way to move the Start Button (Why, I don't know, but we wonder nonetheless). They usually quickly discover that the answer is "no" and move on with their lives, possibly with one more thing they love to gripe about when discussing Microsoft. However, they aren't entirely correct.
The Start Button can be moved. Briefly.
Depending on your build of Windows 95, you will be able to move the Start Button to a different position on the Taskbar until you close your Windows session. Other builds (such as my own) can move it's position for only a few seconds, when it will replace itself in it's usual, left-aligned place on the Taskbar. Here's how it's done:
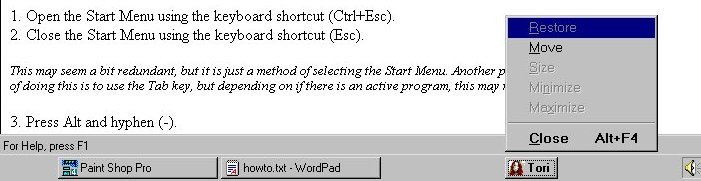
1. Open the Start Menu using the keyboard shortcut (Ctrl+Esc).
2. Close the Start Menu using the keyboard shortcut (Esc).
This may seem a bit redundant, but it is just a method of selecting the Start Menu. Another possible way of doing this is to use the Tab key, but depending on if there is an active program, this may not work.
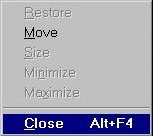
3. Press Alt and hyphen (-).
This opens a menu of commands for the start button similar to pressing Alt+Space in a program, or clicking the program's icon in the upper-left corner of the title bar.
4. Select "Move" either by pressing "m" (the hotkey)
or highlight it using the down/up arrows then press Enter.
5. Use the right/left arrow keys to re-position the Start Button.
6. When you have positioned the button, press Enter to set it in place.
Note: Before you set the Start Button's new position, Escape will replace it in it's original position.
1.5.2 Closing the Start Button
If you have already played with moving the Start Button (Section 1.5.1) you may have noticed the other option available for the Start Button; you can close it. This will create some difficulties with accessing some programs, and closing windows, however these problems can be easily dealt with (See Section 1.5.2.1). To close the Start Button:
1. Open the Start Menu using the keyboard shortcut (Ctrl+Esc).
2. Close the Start Menu using the keyboard shortcut (Esc).
This may seem a bit redundant, but it is just a method of selecting the Start Menu. Another possible way of doing this is to use the Tab key, but depending on if there is an active program, this may not work.
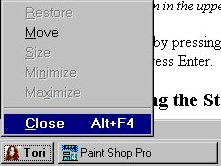
3. Press Alt and hyphen (-).
This opens a menu of commands for the start button similar to pressing Alt+Space in a program, or clicking the program's icon in the upper-left corner of the title bar.
4. Select "Close" either by pressing "c" or Alt+F4 (the hotkeys) or highlight it using the up/down arrows then press Enter.
1.5.2.1 Re-Opening the Start Button
Once you've closed the Start Button, you might start to wonder just how you're going to close Windows. Maybe you'll use the Alt+F4 method from Section 1.2.5. But, maybe you skipped over that section (You naughty person) and don't know about Alt+F4 (Well, you do now, but we're not going to mention that, are we?), or maybe you just want to access something off the Start Button, but don't want to go through a re-boot... In any case, the way you get the Start Button back is to refresh the Windows Desktop as in Section 1.1.4.
Note: Anything in the system tray on the Taskbar will no longer appear in the tray after Explorer has been restarted. These programs will remain in memory, however you will no longer be able to access them.
There are times (Particularly around Mid-Terms and Finals for students) when you may be actively working on a particular document quite often. In this case, it would be easier for you to be able to open the program straight to that document, rather than opening the program, then the document, or opening Explorer to the document, then double-clicking. Here's a trick I learned writing term-papers.
Since most documents are associated with programs, when you double-click them the program associated will open so you can read/edit the file. This also works when you trigger a shortcut to that file. To place a shortcut to the document in your Start Menu, do the following:
1. Open the Taskbar Properties menu (Either via the Settings directory
on the Start Menu or as described in Section 1.6.1).
2. Select the Start Menu Programs tab.
3. Select Add
4. Select the document (You will need to change the browse settings from
"Programs" to "All Files".
5. Select the location on the Start Menu where you want the document listed.
Note: You can place Shortcuts to programs and documents in the Start Menu so that they will appear above "Programs" when you first select the Start Button. To do this, place the Shortcut in the directory labeled "Start Menu".
1.5.4 Control Panel Shortcuts in Start Menu
Some items from the Control Panel are used more often than others (I use "Sounds" and "Tweak UI" most often). You may wish to make these items more accessible than the rest of the Control Panel by placing a Shortcut to them off the Start Menu. To do this:
1. Open the Control Panel.
2. Open the Taskbar Properties menu (Either via the Settings directory
on the Start Menu or as described in Section 1.6.1).
3. Select the Start Menu Programs tab.
4. Select Advanced.
5. Create a directory where you would like to place the new Shortcuts.
6. Right click on the item(s) from the Control Panel you would like to
create a Shortcut for.
You can select more than one item, by highlighting them individually with the left mouse button while holding down Ctrl. After they have been highlighted, release Ctrl, and select them with a right-click.
7. Drag the item(s) over the "Exploring - Start Menu" button
on the Taskbar, until it opens.
8. Drop the item(s) into the directory you have created.
9. Select "Create Shortcut(s) Here"
Suppose you've been using the Run command off the Start Menu, and now your Run history has become cluttered with files you rarely use or no longer have on your system. Or perhaps it has some programs in there that you don't want other people to see that you've run. In any case, you'll want to clear your Run history, and here's how you do it...
Tweak UI:
The easy way is to set Tweak UI to clear it for you. From the Paranoia tab, in the "Covering Your Tracks" section, check the box next to "Clear Run history at logon". Now every time you run Windows, your run history will be emptied.
Suppose you still don't have Tweak UI, or perhaps you like the Run history, but just want to clear out a few bits... Here's how to do it:
Regedit.exe:
Warning: Before you edit the Registry, read the comments in Section 3.0 of this text.
1. From HKEY_CURRENT_USER find the directory \Software\Microsoft\Windows\CurrentVersion\Explorer\RunMRU\
2. Delete the entries you no longer want to appear in your run history.
Note: The file MRUList contains the order in which each program will be listed in your run history. Each program is represented by a variable (a letter). Any problems caused by this registry hack may be associated with this file.

While there really isn't too much that can be done with the Taskbar, it is still an important part of Windows 95. Here's a couple tips on how to use it more efficiently.
1.6.1 Selecting Taskbar without searching the Start Menu.
The ordinary way to select the Taskbar Properties menu would be to go through the Start Menu to the Settings directory. There is, however, a faster way of doing this. Simply right click on an open area of the Taskbar, then select Properties.
1.6.2 Tricks to hide the Taskbar (Auto-hide, Sizing, Location, Color).
So now that you know all these really cool tricks for Windows 95, who needs the Taskbar?! It's just eating up space on your desktop, after all. So how do you get rid of it? You can't. Sorry, but you can't.
You can, however do a good job of making it pretend to go away using the following techniques.
The Auto-hide feature will make the Taskbar duck out of sight until you drag the mouse near it, when it pops back out full-size. This does get to be a pain sometimes, especially when trying to use mouse-based features at the edges of the screen where the taskbar is located (Don't even bother with Auto-hide when the Taskbar is at the top of the screen, it'll just drive you batty).
A second technique to hide the Taskbar is to re-size it to make it smaller. Re-sized to it's smallest size, you can simulate the "hidden" state of Auto-hide, which is not quite invisible. This is somewhat easier on the mind, however, since you don't have to deal with it popping out at you unexpectedly.
The way to change the Taskbar's size is to drag the mouse over the edge of the Taskbar until the re-size arrow appears (If you don't know what it looks like, you might want to consult your Windows manual. You might also want to hold off on re-sizing the Taskbar, cause you obviously haven't been at this long) then click and drag, just like you would with any ordinary window.
The third technique to hide the Taskbar is location. By dragging on the taskbar, you can move it to the top of the screen, or one of the sides. The main problem with this is that by the time you've gotten around to trying to hide the Taskbar, you've probably grown fairly used to it being at the bottom of the screen.
The final method to "hide" the Taskbar is to alter the color so that it blends better with the background. To change the color, right click on an open area of the desktop, select Properties. The colors can be changed with the Appearance tab. The color to change is for "3d Objects". This method has the drawback of changing colors for other things than just the Taskbar, which might get pretty annoying, or might be fairly convenient.